Creating an MLCP Docker container with pre-loaded data

Sometimes it’s useful to be able to pass around a known dataset to use in dev, testing, and QA activities. Here, we will learn how to create a Docker image with a known dataset and then use it to deploy that data to a MarkLogic instance using the container’s MLCP library. Without further ado, let’s get started!
MarkLogic officially supports Docker containers with version 9.0-5 or later. Please use discretion when working with these examples using older versions of MarkLogic.
Assumptions
Before proceeding with this tutorial, it is assumed that you have:
- Docker version 1.12+ (Previous versions of Docker will most likely work as well, but not tested.)
- Basic familiarity with Docker (See Building a MarkLogic Docker Container for an introduction to using MarkLogic with Docker)
Creating the Docker Image
The first thing to do is create the Dockerfile we need for building our image.
Dockerfile
- Create a folder to hold all of our files then open a terminal window and navigate to this directory.
- Download the current version of MLCP from MarkLogic and place the zip in the directly you created.
- Create a file called “Dockerfile” and copy the code below into the file.
FROM FROM centos:centos7
MAINTAINER <your information name & email>
# Install core packages
RUN yum update -y &&
  yum install -y unzip wget &&
  yum clean all
# Install java JDK
ENV JAVA_VERSION 8u112
ENV BUILD_VERSION b15
RUN wget --no-cookies --no-check-certificate --header "Cookie: oraclelicense=accept-securebackup-cookie" "http://download.oracle.com/otn-pub/java/jdk/$JAVA_VERSION-$BUILD_VERSION/jdk-$JAVA_VERSION-linux-x64.rpm" -O /tmp/jdk-8-linux-x64.rpm &&
  yum -y install /tmp/jdk-8-linux-x64.rpm &&
  alternatives --install /usr/bin/java jar /usr/java/latest/bin/java 200000 &&
  alternatives --install /usr/bin/javaws javaws /usr/java/latest/bin/javaws 200000 &&
  alternatives --install /usr/bin/javac javac /usr/java/latest/bin/javac 200000 &&
  rm /tmp/jdk-8-linux-x64.rpm
ENV JAVA_HOME /usr/java/latest
ARG MLCP_VERSION='8.0.6'
#Copy the necessary files into our container
COPY mlcp-*.zip /opt/mlcp.zip
COPY run_script.sh /opt
COPY data /data

# If desired, fill in the config file with additional MLCP import options
COPY mlcp_config.txt /opt
RUN chmod a+x /opt/run_script.sh
#Unzip the MLCP archive
RUN unzip -o /opt/mlcp.zip -d /opt && rm /opt/mlcp.zip
ENV MLCP /opt/mlcp-$MLCP_VERSION/bin
ENV PATH $MLCP:$JAVA_HOME:$JAVA_HOME/bin:$PATH

# Input File types viable options [ aggregates, archive, delimited_text, delimited_json, documents, forest, rdf, sequencefile ]
ENV INPUT_FILE_TYPE "archive"
ENV INPUT_FILE_PATH "/data"
ENV CONFIG_FILE_PATH "/opt/mlcp_config.txt"

ENTRYPOINT ["/opt/run_script.sh"]
Let’s look at what’s going on in the Dockerfile. First, we’re basing our image on Centos 7 and then we’re updating our yum package manager while installing the necessary libraries we’ll need for our environment. Next, we set some environment variables and then install Java JDK. After that, we’re copying some required scripts and MLCP configuration files (we’ll create them next) and then adding the necessary permissions to the script. Lastly, we’re setting a few more environment variables to be used inside the scripts and then setting the default “entrypoint” script to run by default when the container is started.
When building out image, we should update the following environment variables as required:
- ARG MLCP_VERSION – Set this value to the version of MLCP downloaded earlier.
- ENV INPUT_FILE_TYPE – Specify the type of data being imported. [ aggregates, archive, delimited_text, delimited_json, documents, forest, rdf, sequencefile ]
- ENV INPUT_FILE_PATH – We shouldn’t have to modify this unless we change the name of the folder we’re copying data into in ourcontainer.
- ENV CONFIG_FILE_PATH – We shouldn’t have to modify this unless we change where the mlcp_config.txt file is copied to or we change the name of the config file itself.
Scripts
- Create a folder called “data” in the one created earlier. This folder will hold the data we want to import into MarkLogic.
- Create a file called run_script.sh and copy the code below into the file.
#!/bin/bash
# This script is responsible for importing/exporting documents using MLCP based upon a user-defined configuration file
# Required Parameters:--host, --port, --username, --password
# Optional Parameters:
# 	--batch_size
# 	--database
# 	--fastload {no arguments}
# 	--namespace
# 	--output_cleandir {no arguments}
# 	--output_collections
# 	--output_directory
# 	--output_uri_prefix
# 	--output_uri_suffix
# 	--tolerate_errors
# NOTE: Optional parameters that take a value MUST be in the form of --batch_size=<some value>. The equal sign is required.
###########################################################################################################################
# Ensure the /data folder has files.
# This test may need to be modified if we discover there are NUMEROUS files in the directory
if [ ! "$(ls -A $INPUT_FILE_PATH)" ]; then
  echo "No files present in data directory ($INPUT_FILE_PATH) for import. Exiting!"
  exit 1
fi
function term_handler {
  echo "Shutting down MLCP Container...";
  exit 0;
}
function usage {
  printf "##############################################################################################################################n"
  printf "Required Parameters:--host, --port, --username, --password n";
  printf "Optional Parameters:nt--batch_sizent--databasent--fastload {no arguments}nt--namespacent--output_cleandir {no arguments}nt--output_collectionsnt--output_directorynt--output_uri_prefixnt--output_uri_suffixnt--tolerate_errorsn";
  printf "NOTE: Optional parameters that take a value MUST be in the form of --batch_size=<some value>. The equal sign is required.n"
  printf "##############################################################################################################################n"
}
trap term_handler SIGTERM SIGINT
#If a configuration file for MLCP options is found and has size, add it as a command argument
if [ -s $CONFIG_FILE_PATH ]; then
  printf "Options file found. Adding it to MLCP argumentsn"
  mlcp_opts=" -options_file $CONFIG_FILE_PATH"
fi
# Execute getopt on the arguments passed to this program, identified by the special character $@
# There is an unsupported short option "h" included, but not used. The -o flag is required for the getopt command
PARSED_OPTIONS=$(getopt -n "$0" -o h:: --long "host:,port:,username:,password:,batch_size::,database::,fastload,namespace::,output_cleandir,output_collections::,output_directory::,output_uri_prefix::,output_uri_suffix::,tolerate_errors"  -- "$@")

#Bad arguments, something has gone wrong with the getopt command.
if [ $? -ne 0 ]; then
  echo "Failed parsing options.";
  usage;
  exit 1;
fi
#If the mandatory arguments are not supplied, print warning and exit
if [ $# -lt 8 ]; then
  echo "Incorrect number of arguments supplied."
  usage;
  exit 1
fi
eval set -- "$PARSED_OPTIONS"
printf "MLCP Auth Credentials:n"
while true;
do
  case "$1" in
    --host)
      printf "tHOST:tt$2n"
      mlcp_opts+=" -host $2"
      shift 2 ;;
    --port)
      printf "tPORT:tt$2n"
      mlcp_opts+=" -port $2"
      shift 2 ;;
    --username)
      printf "tUSERNAME:t$2n"
      mlcp_opts+=" -username $2"
      shift 2 ;;
    --password)
      printf "tPASSWORD:t$2n"
      mlcp_opts+=" -password $2"
      shift 2 ;;
    #Optional parameters that can be passed in
    --batch_size)
      case "$2" in
        "") echo "Option BATCH_SIZE not passed in any value. Exiting script"; exit 1 ;;
         *) mlcp_opts+=" -batch_size $2" ; shift 2 ;;
      esac ;;
    --database)
      case "$2" in
        "") echo "Option DATABASE not passed in any value. Exiting script"; exit 1 ;;
         *) mlcp_opts+=" -database $2" ; shift 2 ;;
      esac ;;
    --fastload)
      mlcp_opts+=" -fastload true"
      shift ;;
    --filename-as-collection)
      mlcp_opts+=" -fastload true"
      shift ;;
    --namespace)
      case "$2" in
        "") echo "Option NAMESPACE not passed in any value. Exiting script"; exit 1 ;;
         *) mlcp_opts+=" -namespace $2" ; shift 2 ;;
      esac ;;
    --output_cleandir)
      mlcp_opts+=" -output_cleandir true"
      shift ;;
   	--output_collections)
      case "$2" in
        "") echo "Option OUTPUT_COLLECTIONS not passed in any value. Exiting script"; exit 1 ;;
         *) mlcp_opts+=" -output_collections $2" ; shift 2 ;;
      esac ;;
    --output_directory)
      case "$2" in
        "") echo "Option OUTPUT_DIRECTORY not passed in any value. Exiting script"; exit 1 ;;
         *) mlcp_opts+=" -output_directory $2" ; shift 2 ;;
      esac ;;
    --output_uri_prefix)
      case "$2" in
        "") echo "Option OUTPUT_URI_PREFIX not passed in any value. Exiting script"; exit 1 ;;
         *) mlcp_opts+=" -output_uri_prefix $2" ; shift 2 ;;
      esac ;;
    --output_uri_suffix)
      case "$2" in
        "") echo "Option OUTPUT_URI_SUFFIX not passed in any value. Exiting script"; exit 1 ;;
         *) mlcp_opts+=" -output_uri_suffix $2" ; shift 2 ;;
      esac ;;
    --tolerate_errors)
      mlcp_opts+=" -tolerate_errors true"
      shift ;;
    --)
      shift
      break;;
  esac
done
mlcp_opts+=" -input_file_path $INPUT_FILE_PATH"
mlcp_opts+=" -input_file_type $INPUT_FILE_TYPE"
printf "nUser Provided MLCP Options used for this run:${mlcp_opts// -/\n\t-}n"
#Run MLCP with provided arguments
mlcp.sh import $mlcp_opts
printf "nMLCP Finished. Press 'Ctrl+C' to terminate container/processn"
# Do nothing loop to keep script active
while true; do :; done
Although the file comments provide a lot of explanation, this file will ensure the container stays running and parses the arguments we pass to the Docker Run command when we instantiate the container to run MLCP.
- Create a file called mlcp_config.txt.
This file can be filled in or left empty. Its purpose is to allow the individual building the initial image to enter MLCP options he/she knows will be required based upon the type of data stored in our container. Ensure you follow proper formatting for this file. The basic format is:
-output_uri_replace
"/old-uri/,'/new-uri/'"
Just add as many options as required following this format. ONLY use options valid with the Import command since that’s all this container supports.
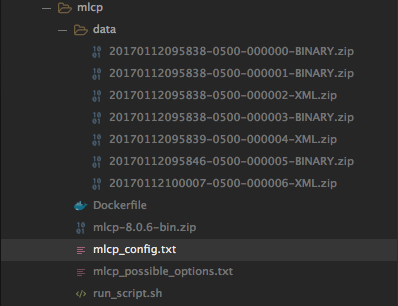
- Last, we need some data to import. For this post, I’ve used MLCP to export an archive from an existing MarkLogic database and copied it to the data folder. We can use any data set we like, just put it in the data folder and update the MLCP options in the Dockerfile.
Here is what the folder structure should look like. Note, there’s a file called mlcp_possible_options.txt in the example below. Disregard it for the purposes of this tutorial. In the screen shot below, the data folder contains archives of metadata and binaries sampled from an existing MarkLogic database.
Now we have the necessary scripts, data, and have created our Dockerfile. Let’s go ahead and build the image. Open a terminal window and confirm the working directory, then enter:
docker build -t <your registry/your image name>:<image tag> .
Note: It may be helpful to utilize the image tag attribute to specify the data in the container, for example:
docker build -t local/mlcp:enron .
It would also be beneficial to create a “base” MLCP image with the necessary libraries and then use it as the base for subsequent data-specific images. That way, every time we build the image with new data, all of the required libraries are already part of the image and don’t have to be reinstalled each time the image is created. Steps required to build an MLCP Base image are at the end of the blog.
Running the Container
Running the container is easy. Simply enter the following:
docker run --rm <image name>:<image tag> --host <target MarkLogic server> --username admin --password password --port <port>
The docker command above uses the following options:
- –rm – Tells the Docker engine to completely delete the container after it exits.
- <image name>:<image tag> – Should be the same as the name/tag you used when building the image
- –host – This is the MarkLogic server you want to import data into
- –username – Username used to authenticate with your MarkLogic server
- –password – Password associated with the username
- –port – The XDBC App server port associated with the database you want to insert data into
Mandatory Options for container:
- –host
- –port
- –username
- –password
The following are the optional arguments you can provide to this container:
- –batch_size
- –database
- –fastload {takes no value} If passed, assumes true, otherwise false
- –filename-as-collection
- –namespace
- –output_cleandir {takes no value} If passed, assumes true, otherwise false
- –output_collections
- –output_directory
- –output_uri_prefix
- –output_uri_suffix
- –tolerate_errors
Note: When passing optional arguments, use the –option_name=option_value syntax.
This is by no means an all-inclusive list, but savvy users could easily modify the script to support additional arguments (don’t forget that there is an MLCP options file to use).
Below is an example output you can expect when running the container.
docker run --rm  mlcp:test --host 192.168.210.198 --username admin --password password --port 8025
Options file found. Adding it to MLCP arguments
MLCP Auth Credentials:
  HOST:		192.168.210.198
  USERNAME:	admin
  PASSWORD:	password
  PORT:		8025
User Provided MLCP Options used for this run:
  -options_file /opt/mlcp_config.txt
  -host 192.168.210.198
  -username admin
  -password password
  -port 8025
  -input_file_path /data
  -input_file_type archive
17/01/16 14:06:25 INFO contentpump.LocalJobRunner: Content type: XML
17/01/16 14:06:25 INFO contentpump.FileAndDirectoryInputFormat: Total input paths to process : 7
17/01/16 14:06:26 INFO contentpump.LocalJobRunner:  completed 0%
17/01/16 14:07:16 INFO contentpump.LocalJobRunner:  completed 14%
17/01/16 14:07:21 INFO contentpump.LocalJobRunner:  completed 29%
17/01/16 14:07:24 INFO contentpump.LocalJobRunner:  completed 43%
17/01/16 14:07:25 INFO contentpump.LocalJobRunner:  completed 57%
17/01/16 14:07:26 INFO contentpump.LocalJobRunner:  completed 71%
17/01/16 14:08:38 INFO contentpump.LocalJobRunner:  completed 86%
17/01/16 14:08:40 INFO contentpump.LocalJobRunner:  completed 100%
17/01/16 14:08:40 INFO contentpump.LocalJobRunner: com.marklogic.mapreduce.MarkLogicCounter:
17/01/16 14:08:40 INFO contentpump.LocalJobRunner: INPUT_RECORDS: 44298
17/01/16 14:08:40 INFO contentpump.LocalJobRunner: OUTPUT_RECORDS: 44298
17/01/16 14:08:40 INFO contentpump.LocalJobRunner: OUTPUT_RECORDS_COMMITTED: 44298
17/01/16 14:08:40 INFO contentpump.LocalJobRunner: OUTPUT_RECORDS_FAILED: 0
17/01/16 14:08:40 INFO contentpump.LocalJobRunner: Total execution time: 134 sec
MLCP Finished. Press 'Ctrl+C' to terminate container/process
That’s it! We now have an MLCP Docker container to store pre-defined datasets that we can pass around to use for dev, testing, and SQA activities. Enjoy!!
Building an MLCP Base Image
Following the steps outlined at the beginning of this blog to build the MLCP Image, we can easily modify them for creating a “Base” image. This way, we’ll have an image with all the necessary libraries already baked in; the only thing we’ll need to do is create a new image based on the Base image and include the data we need in the container with the necessary configurations.
Go ahead and build the image just as described in Creating the Docker Image, but do not add any data to the container so comment out the COPY directive for this
FROM FROM centos:centos7
MAINTAINER <your information name & email>
...
#COPY data /data
...
- Next, make sure the mlcp_config.txt file is empty.
- Save the file and then run the Docker Build command. In this example I’ve called the image mlcp_base and provide a versioning tag v1. You can obviously call it whatever you like and use whatever tagging convention makes sense for you. (Don’t forget to prefix the image name with your registry if you’re publishing to a registry):
docker build -t mlcp_base:v1
Creating Data-Specific MLCP Images
- Create a new folder to hold the configuration and data to be copied to the container.
- In the folder created, create a new Dockerfile called Dockerfile and copy the code below.
FROM [your registry]/mlcp_base:v1
MAINTAINER <your name and email>
# Copy the data we want to import into the image
COPY data /data
# If required, fill in the config file and copy to the /opt directory
COPY mlcp_config.txt /opt
# Input File types viable options [ aggregates, archive, delimited_text, delimited_json, documents, forest, rdf, sequencefile ]
ENV INPUT_FILE_TYPE "archive"
ENV INPUT_FILE_PATH "/data"
ENV CONFIG_FILE_PATH "/opt/mlcp_config.txt"
- Make sure to update the environment variables as required. Specifically, ENV INPUT_FILE_TYPE. This should reflect the type of data being packaging up.
- Create a folder inside the one created in step 1 and then copy the data to be packaged in the container into this folder.
- Create a file to store data-specific MLCP options (if required) and call it mlcp_config.txt. If additional options aren’t necessary, comment out the COPY mlcp_config.txt directive.
- If you created an options file, modify it as required to support the necessary MLCP import options needed based on the data used for this image and then save it.
- Now, build the new data-specific image:
docker build -t [your registry/][your image name]:[image tag]
So for example, you could call it my_registry/mlcp_enron:latest or my_registry/mlcp:enron. You should notice the build process doesn’t take as long (depending on the size of the dataset you’re copying to the image). That’s it! You now have a recipe for creating a data-specific MLCP image to share with your teammates.
Additional Resources
- Read this blog on Building a MarkLogic Docker Container
- Read this blog on Automating MarkLogic Docker Installs
- Read this blog on Deploying a Marklogic Cluster using Kubernetes and NGINX
- Read this blog on MarkLogic Docker Container on Windows
- View this webinar on Running Marklogic in Containers (Docker and Kubernetes)
- Watch this video tutorial on MLCP
- Read the MLCP User Guide
Bill Miller
View all posts from Bill Miller on the Progress blog. Connect with us about all things application development and deployment, data integration and digital business.
Comments
Topics
- Application Development
- Mobility
- Digital Experience
- Company and Community
- Data Platform
- Secure File Transfer
- Infrastructure Management
Sitefinity Training and Certification Now Available.
Let our experts teach you how to use Sitefinity's best-in-class features to deliver compelling digital experiences.
Learn MoreMore From Progress


Latest Stories
in Your Inbox
Subscribe to get all the news, info and tutorials you need to build better business apps and sites